EMCMS Rental
Property managment System
- created: 12/24/2018
- latest update: 05/19/2020
- by: Erland Muchasaj
- erlandmuchasaj.tech/
- email: info@erlandmuchasaj.com
EMCMS Rental is a web application that brings Hosts and Travelers together in a closed online environment. All members can add and manage properties, Manage reservations, leave reviews, manage calendar, transactions and much more. Each member gets a profile with all their related information about their properties and travel information. EMCMS Rental is build on the framework CakePHP. This makes it easy to customize and extend EMCMS Rental to your own needs.
Introduction
Thank you
First of all I would like to thank you for purchasing EMCMS Rental!
Something about me.
I am a Senior web developers located in Tirana (Albania) with deep passion for building great looking, super user friendly web applications. I am humble narcissistic full stack web developer, specializing in PHP and related technologies. I enjoy turning complex problems into simple, beautiful and intuitive interface designs.
About EMCMS Rental
EMCMS Rental is a trusted community marketplace for people to list, discover, and book unique accommodations around the world — online or from a mobile phone or tablet. It is build on CakePHP framework. This makes it easy to customize and extend to your own needs.
Customize EMCMS Rental
If you want to customize EMCMS Rental and you can’t do it on your own, I’ll be happy to do it for you. You can send your request to info@erlandmuchasaj.com
Questions / Support
If you have a question and you can’t find the answer in this documentation, please contact me through info@erlandmuchasaj.com or through my website: https://erlandmuchasaj.tech
I am aware that some people obtain software through illegal sources. I will only deliver support to customers who actually bought the script. Therefore, please provide the product name and your purchase code with your request.
Requirements
Web server
EMCMS Rental is fast and easy to install. The minimum requirements are a webserver and a copy of EMCMS Rental, that’s it! While this manual focuses primarily on setting up on Apache (because it’s the most commonly used), you can configure EMCMS Rental to run on a variety of web servers such as lighttpd or Microsoft IIS.
In order to run EMCMS Rental you will need the following:
- HTTP Server. For example: Apache. mod_rewrite is preferred, but by no means required.
- PHP 5.3.0 or greater (CakePHP version 2.6 and below support PHP 5.2.8 and above). CakePHP version 2.8.0 and above support PHP 7
- (*) To use PHP above 7.1 you may need to install mcrypt via PECL. See Security for more information
- MySQL (4 or greater)
- Your tmp directory is writable.
- You should make sure you have the correct PDO extensions installed.
Knowledge*
Installation
Preparing your server
In order to run EMCMS Rental you need an empty root directory on your domain or subdomain. You also need a MySQL database. You can create a database in the control panel from your hosting provider. You can go to Databases > MySQL Database Wizard, and start importing the DB.
Uploading files
Upload all the files in the folder 'Upload' from your downloaded package. You must upload the files to the root of your domain or a subdomain. Make sure that your upload contains all hidden files as well.
If you are uploading the project in a local machine then upload all files that are inside 'Upload' folder from the downloaded package into path/to/wamp/www/project_name or path/to/xampp/htdocs/project_name folder.
Setting permissions
You need to set some permission in order to make EMCMS Rental work. Make sure the following files and (sub)directories are writeable by the web server user:
- app/tmp (and all subfolders)
- app/Console/cake
- app/Config/core.php
- app/Config/database.php
- app/Config/email.php
Database Configuration
Uploading Database
First thing we need to do after uploading project to our server or our local machine is to create a database and import the DB schema.
First navigate to phpMyAdmin. There are 2 cases.
-
If you are in a local machine navigate to
http://localhost/phpmyadmin/-
Click on databases on top bar.

-
(1) write your db name, (2) select the charset encoding and then (3) click create

-
After the DB is createt clik on the newly created DB and then click on import

-
Here you have to option.
(a) One is click Chose File, select emcmsrental.sql file and click GO,
(b) just Drag&Drop emcmsrental.sql file here and you are finished.
-
-
If you are in a server (in my case BlueHost), follow below steps:
-
Go to bluehost.com and login

-
Then click on advanced tab on left sidebar

-
Click on (1) MySQL Database Wizard

-
Create a new Database and click Next Step

-
Create a new Database User and click Create User

-
Give the newly created user privileges to the new database and click Next Step

-
Go To step (3) and click phpMyAdmin. this will redirect you to phpmyadmin. and then follow the same steps as you would on your local machine to upload a sql file.
-
After you have uploaded the project to your desired folder localy or in server, and you have also imported the Database, navigate to /path/to/project_name/app/Config/database.php.default and rename it to /path/to/project_name/app/Config/database.php.
Open the database.php file with the text editor of your choice and replace the DB_USERNAME, DB_PASSWORD, DB_NAME with your own credentials respectively.
				class DATABASE_CONFIG {
					public $default = array(
						'datasource' => 'Database/Mysql',
						'persistent' => false,
						'host' => 'localhost',
						'login' => 'DB_USERNAME',
						'password' => 'DB_PASSWORD',
						'database' => 'DB_NAME',
						'prefix' => '',
						//'encoding' => 'utf8',
					);

					public $test = array(
						'datasource' => 'Database/Mysql',
						'persistent' => false,
						'host' => 'localhost',
						'login' => 'user',
						'password' => 'password',
						'database' => 'test_database_name',
						'prefix' => '',
						//'encoding' => 'utf8',
					);
				}
Cron Configuration
A common thing to do with a shell is making it run as a cronjob to clean up the database once in a while or send newsletters. This is trivial to setup, for example:
				  */5  *    *    *    *  cd /full/path/to/app && Console/cake myshell myparam
				# *    *    *    *    *  command to execute
				# │    │    │    │    │
				# │    │    │    │    │
				# │    │    │    │    \───── day of week (0 - 6) (0 to 6 are Sunday to Saturday,
				# |    |    |    |           or use names)
				# │    │    │    \────────── month (1 - 12)
				# │    │    \─────────────── day of month (1 - 31)
				# │    \──────────────────── hour (0 - 23)
				# \───────────────────────── min (0 - 59)
If you are on a shared hosting then you need to provide full paths and you probably will not have access to bash. So let’s assume that you installed your application at the root folder of /home/myawesomesite/public_html/, then you will have to setup the following command for your cron job
				cd /full/path/to/app && Console/cake sender - Every minute
				cd /full/path/to/app && Console/cake cron - Every 5 min
				cd /full/path/to/app && Console/cake checkin_day - twice an houer
				cd /full/path/to/app && Console/cake reset_emails -one a day
				cd /full/path/to/app && Console/cake clear_attempt - once a day
				cd /full/path/to/app && Console/cake clear_emails - once a month
Other Configuration
Inside:
App/Config/core.phpsearch and find
Configure::write('App.fullBaseUrl', 'http://emcmsrental.com') and repalce with your own url.
This is very important in order for emails and cron to work properly.
Again inside:
App/Config/core.phpchange
Configure::write('debug', 2); to Configure::write('debug', 0);
Front end
You can edit the front end page layout by editing the following files:
- app/View/Layouts/default.ctp.
- app/View/Layouts/search.ctp.
- app/View/Layouts/login.ctp.
- app/webroot/assets/css/custom.css
- app/webroot/assets/css/user.css
CakePHP has a Convention Over Configuration design so for each controller action you have a view.
Multilanguage
A powerfull tool of EMCMS is the availability to translate the core static strings in different languages with few steps.
If you are only adding new language from admin panel, then after adding a new language you have {language_code} and {locale}. Take notice of the {locale} of language. since this will be used as folder name in the following steps.
- After you have created a new language from admin pannel, navigate to /app/Locale and create a file corresponding to that locale like so: /app/Locale/{locale}/LC_MESSAGES/default.po
- Copy the file from App/view/Locale/default.pot to /app/Locale/{locale}/LC_MESSAGES/default.po and rename it to default.po.
- Open the default.po file with PoEdit
-
Translate the message ID to the desired language.
							#: View/Users/view.ctp:1
							msgid “Welcome”
							msgstr “Accueil”

							#: View/Users/view.ctp:2
							msgid “Welcome %s , to our site”
							msgstr “Se félicite %s, sur notre site”
If you are editing the core of EMCMS and adding new static strings etc thatn follow these steps.
-
Step 1
Internationalize your code.
To internationalize your code, all you need to do is to wrap strings in __() like so:
__('Posts'); -
Step 2
Generate your Po(.po) files
Go into console and Navigate to your project
cd /var/www/{project-name}/appand execute the following command../Console/cake i18n extract --overwrite
This command will generate pot file(s) into
/app/view/Locale
These files are not used by EMCMS but are used to create or update po files, which contain the translated strings. -
Step 3
Copy POT files to desired {locale}.
EMCMS will look for PO files in the following location,
/app/Locale/{locale}/LC_MESSAGES/{domain}.poWhere: {locale} is the ISO 639-2 Code of language code (3 character language code).
The default domain is ‘default’, therefore your locale folder would look something like this:/app/Locale/eng/LC_MESSAGES/default.po (English) /app/Locale/fra/LC_MESSAGES/default.po (French) /app/Locale/por/LC_MESSAGES/default.po (Portuguese) /app/Locale/ita/LC_MESSAGES/default.po (Italian)
-
Step 4
Editing PO files.
To create or edit your po files it’s recommended that you do not use your favorite editor. To create a po file for the first time it is possible to copy the pot file to the correct location and change the extension however unless you’re familiar with their format, it’s quite easy to create an invalid po file or to save it as the wrong charset (if you’re editing manually, use UTF-8 to avoid problems). There are free tools such as PoEdit which make editing and updating your po files an easy task; especially for updating an existing po file with a newly updated pot file.
Read this article for more details.
External API Integration
I'm using several 3rd party plugins or api integration. All you need to do is navigate to /path/to/project_name/app/Config/site_config.php and change everythign you want specific to your business needs.
Here you need to configure:
- PayPal
- Language
- Currency
- GoogleMaps
- Site Settings
- Social Login Credentials
- etc...
To Enter your own paypal credentials edit the following lines
				// Paypal Configuration Credentials
				$config['PayPal'] = [
					'API_username'      => 'erlandi_20-facilitator_api1.hotmail.com',
					'API_password'      => 'C54BURK3UWMQKPCN',
					'API_signature'     => 'AJaSZvMmqgyAMODA8CnX1wYcW.ckA..ZYEWq2hep2nkn6aaGZkH2D4tB',
					'APP_ID'			=> 'APP-80W284485P519543T',
					'LOGIN_CLIENT_ID'   => 'ATsfTjJogq7dDuySiNMrLqsWFSIwViqpyjVH7109VIB2uxOTNcR3l-LTboGspsxntyJV6FdCaA2OyE7G',
					'LOGIN_SECRET'      => 'EPYnRdwXCSIdvQvTcaotznysh-6VBZg4XumFDQCUN8HaUPP5_lPlUoo8VZsNeI5pOa7IfXSFtm6kYJWe',
					'SANDBOX_flag'      => true,
					'RETURN_url'        => rtrim(Configure::read('App.fullBaseUrl'), '/\\') . '/paymentSuccess',
					'CANCEL_url'        => rtrim(Configure::read('App.fullBaseUrl'), '/\\') . '/paymentCancel',
					'IPN_url'   		=> rtrim(Configure::read('App.fullBaseUrl'), '/\\') . '/paymentIpn',
					'PAYMENT_type'      => 'Sale',
					'CURRENCY_code'     => 'USD',
				];
To Edit the stripe credentials edit the following lines
Obtaining your API keys. Your API keys are available in the Dashboard
				// Stripe Configuration Credentials
				$config['Stripe'] = [
					'Secret'=> 'sk_test_tqgfn8bxdbNOEVCsO2uBXY3c',
					'Publishable'=> 'pk_test_HOEZH30MPZ7DTgkw2nWmLLyB',
					'mode'      => 'Test',
					'currency'  => 'usd',
					'fields'    => [
						'stripe_id' => 'id',
						'stripe_last4' => [
							'card' => 'last4',
						],
						'stripe_address_zip_check' => [
							'card' => 'address_zip_check',
						],
						'stripe_cvc_check' => [
							'card' => 'cvc_check',
						],
						'stripe_amount' => 'amount',
					],
				];
Emails:
Now for emails is much easy to configure.
Navigate to /path/to/project_name/app/Config/site_config.php and configure your mail server.
Here you can set up queue emails or instant emails
NOTE:If you set queue emails than you MUST setup crontab email sender to send email through queue.
				# email related configuration on site_config.php
				'instant_mail' 	 => true,       # send mails directly or throught 3rd party
				'email_driver' 	 => 'smtp',     # smtp, default, fast, mailtrap
				'email_provider' => 'Smtp',     # Mailtrap, Smtp, Sendgrid, Sendinblue
				#=================== EDIT ONLY BELOW HERE ============================#
				'email_host' 	 => 'xxxxxxxx', # host name
				'email_username' => 'xxxxxxxx', # username aka email
				'email_password' => 'xxxxxxxx', # email password
				'email_port' 	 => 587,		# port
				'email_timeout'  => 30,			# timeout
				'email_from_name'=> 'EMCMS',    # Name
				'email_from' 	 => 'do-not-reply@domain.com', # deliver email
				'email_tls'		 => false,
				'email_log'		 => false,
				'email_ssl_allow_self_signed' => false,
If you want to change email layout, you can go to:
app/View/Layouts/Emails/html
- For Html emails.
app/View/Layouts/Emails/text
- For Text emails.
If you want to change email template then navigate to:
app/View/Emails/{html|text}/default.ctp
app/View/Emails/{html|text}/new_contact.ctp
app/View/Emails/{html|text}/new_user.ctp
app/View/Emails/{html|text}/reset_password.ctp
IMPORTANT:
The most important thing in the configuration file is the following:
				$config['Website'] = [
					'name'     => 'EMCMS', //  Configure::read('Website.name')
					'sitename' => 'EMCMS Rentals',
					'tagline'  => __('Rent unique places to stay from local hosts in 190+ countries.'),
					'slogan'   => __('Best Rental Script'),
					'homepage_version' => 'v2', // v1 | v2 | v3
					'disable_registration' => false, // true | false
					'copyright' => 'EMCMS, Inc.',
					'powered_by'=> 'Erland Muchasaj',
					'per_page_count' => '20', // 5, 10, 15, 20, 25, 30, 50, 100
					'max_img_pic_property' => '20',  // 5, 10, 15, 20, 25, 30, 35, 40, 45, 50
					'property_limit' => '3',
					'can_users_list' => false,
					'language' => 'en',
					'currency' => 'EUR',
					'timezone' => 'Europe/Amsterdam',
					'address'   => 'Rr. Budi, Tirane, Albania.',
					'contact_number' => '+355672190020',
					'email'     => 'info@erlandmuhcasaj.com',
					'google_analytics_active' => false,
					'google_analytics' => null, // text area.
					'version' => '1.0.0', // Script version
					// currency entiti data
					'currency_entity' => '€',
					'currency_decimal' => '€',
					'currency_symbol' => '€',
					'currency_position' => '%1$s %2$s', # [%2$s] - price, [%1$s] - currency
					'currency_format' => [
						'thousands' => ',',
						'decimals' => '.'
					],
					// seo related data
					'meta_title' => __('Vacation Rentals, Homes, Experiences & Places - EMCMS'),
					'meta_keywords' => __('Vacation Rentals, Homes, Experiences & Places'),
					'meta_description' => __('Unforgettable trips start with EMCMS. Find adventures nearby or in faraway places and access unique homes, experiences, and places around the world.'),
					// social media links
					'facebook' => null,
					'twitter' => null,
					'pinterest' => null,
					'linkedin' => null,
					'googleplus' => null,
					'instagram' => null,
					'tumblr' => null,
					'youtube' => null,
					'vimeo' => null,
					// ofline messages
					'site_status' => false,
					'offline_message' => __('We are under maintenance'),
					# email related configuration
					'instant_mail' 	 => true, # send mails directly throught 3rd party
					'email_driver' 	 => 'smtp', # smtp, default, fast, mailtrap
					'email_provider' => 'Smtp', # Mailtrap, Smtp, Sendgrid, Sendinblue
					#=================== EDIT ONLY BELOW HERE ============================#
					'email_host' 	 => 'xxxxxxxxxx',	# host name
					'email_username' => 'xxxxxxxxxx',	# username aka email
					'email_password' => 'xxxxxxxxxx',	# email password
					'email_port' 	 => 587,			# port
					'email_timeout'  => 30,				# timeout
					'email_from_name'=> 'EMCMS',        # Name
					'email_from' 	 => 'do-not-reply@domain.com', # deliver email
					'email_tls'		 => false,
					'email_log'		 => false,
					'email_ssl_allow_self_signed' => false,
				];
Here are all the site wide configuration settings. General site settings can also be entered from admin dashboard but these will be used as default and fallback if they are not loaded correctly or they are missing. So pay close attention to these!
Demo
If you want to put your site as demo you can just edit this
app/Config/site_config.php
				/**
				 * CakePHP Demo Mode:
				 */
				$config['demo'] = false; // <== set it to true
Maintenance
Maintenance can be either set from config file or from within admin panel. if you want to set ti from config file all you need to do is change:
app/Config/site_config.php
					/**
					 * CakePHP Maintenance:
					 */
					$config['Maintenance'] = [
						'enable' => true, // <==  set to true
					];
Dashboard
Dashboard is a gathering of all listings on EMCMS Rental from all users ordered by date, newest first. Also here administrator is able to see latest reservations online users, and several other statistics regarding the site.
Here on the left side you can manage several data related to site
- Dashboard - Navigate back to dashboard
- Frontend - Redirect user to frontend part of the site.
-
Site Settings
- General - Site wide general settings
- Fees - manage service fee of the site
- Banners - manage the banners on homepage
- Homepage Settings - Manage text info on 3 column on homepage
- Cancellation Policies - Manage cancallation plicies types
-
Category Manager
- All Categories - List of all available categories Article and Experience.
- New Category - Add new Experience or Article Category
-
Article Manager
- All Articlea - Manage list of Articles
- New Article - Create Articles
-
Users
- All users - See a list of all users
- Banned users - see the list of users that are banned
- Add new user
-
* Experiences
- Host Experiences - List of all experiences
- Experience Categories - Manage experience cateogries
-
Properties
- All Properties - See a list of all properties
- Reviews - see the list of all reviews
- Reservations - See a list of all reservations
- Waiting approvement - See a list of all properties that are waiting admin approval to be visible on frontpage
- Deleted properties - Soft deleted properties
-
Site Specification
Here admin can manage all setting related to site such as Currency, Languages, Country list, FAQ-s, homeslider, Cities on homepage etc.
-
Property Specification
Here admin can add or manage extra amenties for proeprtis such as room types, accomodation, characteristics etc
- Manage Static pages.
- All contacts.
Note: *Experience is a Alfa release so please do not consider it as part of the script yet.

Customization Pages & Layout
Themed
EMCMS Property management system can be easely customized. You can take advantage of themes, making it easy to switch the look and feel of your page quickly and easily.
The system uses Master - Slave view structure. This way, you can simply override master view files on a case-by-case basis within your theme folder. If a view file can’t be found in the theme, EMCMS will try to locate the view file in the master folder at:
/app/View/.
How to overwrite the views.
In Order to overwrite any view file of EMCMS simply copy any folder from:
/app/View/*to
/app/View/Themed/ThemeNameExample/*For example to overwrite the homepage (app/View/Properties/index.ctp), the view file would reside at /app/View/Themed/ThemeNameExample/Properties/index.ctp.
Theme assets.
Themes can contain static assets as well as view files. A theme can include any necessary assets in its webroot directory. To use the new theme webroot create directories like:
app/View/Themed/{ThemeNameExample}/webroot{path_to_file}
For Example:
					//When in a theme with the name of 'theme_name_example'
					$this->Html->css('main.css');

					//creates a path like
					/theme/theme_name_example/css/main.css

					//and links to
					app/View/Themed/ThemeNameExample/webroot/css/main.css
For more info on how to increase performance of theme assets read here.
Using multiple Themes.
If you want to use multiple theames, or you want to usw different themes for different part of the script than you need to specify the theme name in your controller.
					class ExampleController extends AppController {
					    public $theme = 'ThemeNameExample';
					}
You can also set or change the theme name within an action or within the `beforeFilter` or `beforeRender` callback functions:
$this->theme = 'ThemeNameExample';Theme view files need to be within the:
/app/View/Themed/folder.
Within the themed folder, create a folder using the same name as your theme name.
For example, the above theme would be found in:
/app/View/Themed/ThemeNameExampleNOTE: It is important to remember that EMCMS expects CamelCase theme names.
FAQS
-
Where can i edit Homepage tagline?
On admin panel att SiteSetting > General
-
Where can i edit banner?
On admin pannel at SiteSetting > Banner
-
Where can i edit experiences and properties shown on homepage?
In homepage are shown only proeprties and experiences which Are active, Accepted by admin, and marked as featured by admin throught admin pannel. These can be done through admin dashboard at: a) Expereinces > Host Experiences. and mark as featured.
b) Properties > All properties. and mark them as featured. -
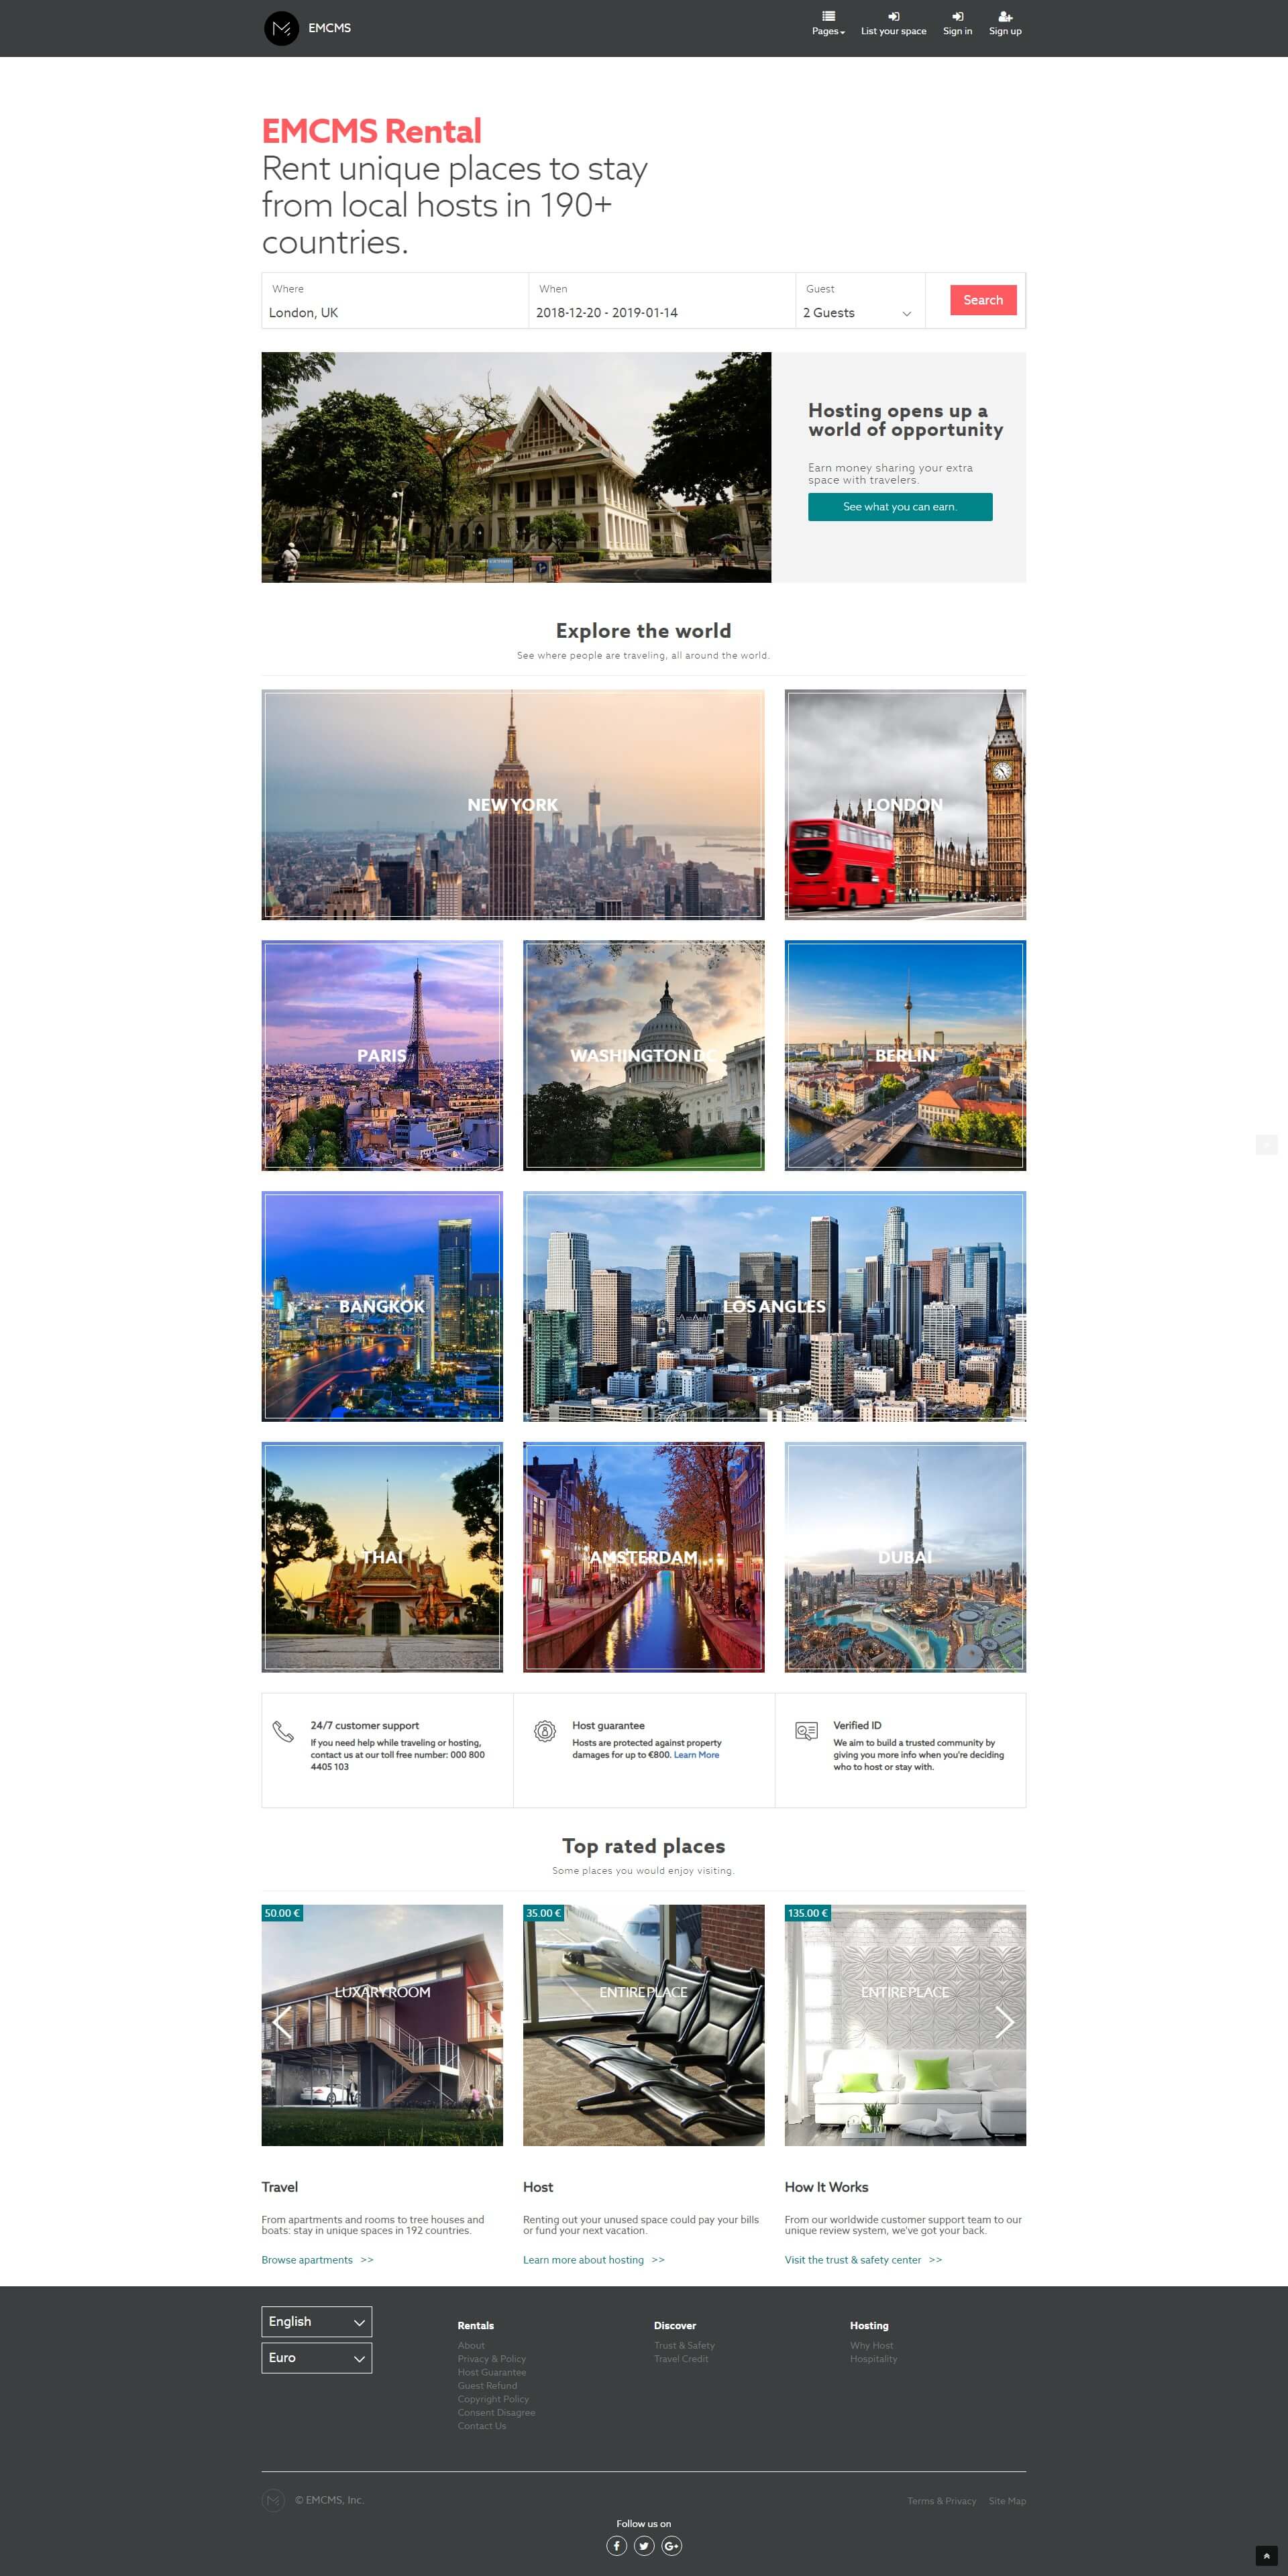
Where to edit Explore the world?
Site Specifications > Neighberhoods > All Cities. Here you can Drag & Drop cities and they will be displayed in frontend in this order. To Edit the file and the Text of "Explore the world..." got to app/Views/Frontend/featured_cities.ctp
-
Where to edit Explore the world?
Site Specifications > Neighberhoods > All Cities. Here you can Drag & Drop cities and they will be displayed in frontend in this order. To Edit the file and the Text of "Explore the world..." got to: app/Views/Frontend/featured_cities.ctp
-
Where can i edit customer, host, Verified...?
You can edit it through admin dashboard. Navigate to: SiteSetting > Homepage Settings.
-
Where can i edit Footer of the WebPage?
The footer is located under: app/Views/Frontend/footer.ctp
-
Where do i edit the invoice tempalte?
The invoice layout is located under app/Views/Elements/invoice.ctp
-
Where to change the logo?
The logo and other related image are located in app/webroot/img and app/webroot/img/general there replace the logo of EMCMS with your own.
-
Where can i edit the logo on footer?
The logo in footer is a SVG format. and it can me changed at: app/Views/Elements/Frontend/footer.ctp
-
Where can i edit static pages?
In general all static pages can be managed through admin panel but there are some case which some static use some custom layouts such as Why host, or travel credit can be located under:
app/Views/Pages/static/why_host.ctp and
app/Views/Pages/static/travel_credit.ctp -
I want to change the homepage layout. Where can i do that?
So in order to edit the homepage look and feel there are several files that you need to modify.
Top menu:App/Views/Elements/Frontend/menu.ctp
Header sliderApp/Views/Elements/Frontend/home_v1.ctp v2 and v3
footer:App/Views/Elements/Frontend/footer.ctp
Offcanvas menuApp/Views/Elements/Frontend/offcanvas_menu.ctp
BannerApp/Views/Elements/Frontend/featured_banners.ctp
Properties:App/Views/Elements/Frontend/featured_properties.ctp
Cities:App/Views/Elements/Frontend/featured_cities.ctp
index:App/Views/Properties/index.ctp
To edit sidebar content of logedin user navigate to:App/Views/Elements/Frontend/user_sidebar.ctp
Site CSS is located in:app/webroot/css/custom.css
-
How to add a link to a page i jsut created?
If you created a page through EMCMS panel there are 2 ways to put a link in frontend to point to that page.
The things to replace are `page-slug-name` and `__('Page name')`.echo $this->Html->link(__('Page Name'), '/page-slug-name', ['escape' => false, 'target'=>'_blank'] );echo $this->Html->link(__('Page Name'), ['controller' => 'pages', 'action' => 'display', 'page-slug-name'], ['escape' => false, 'target'=>'_blank'] );NOTE: the __() is used for multi-translation of cakePhP. `escape` escape the string for special characters. -
How to change meta tags?
EMCMS by default uses meta_title and meta_description field of a property when showing it on frontend.
Available meta tags are:- meta_title => used as og:title
- meta_description => used as og:description
- meta_image => used as og:image
- meta_url => used as og:url
- meta_keywords => depricated
This are dynamically populated. If you want to change them there are several ways.
From Controllers:- $this->set('meta_title', 'content here');
- $this->set('meta_description', 'content here');
- $this->set('meta_image', 'content here');
- $this->set('meta_url', 'content here');
- $this->assign('meta_title', 'content here');
- $this->assign('meta_description', 'content here');
- $this->assign('meta_image', 'content here');
- $this->assign('meta_url', 'content here');
-
Where can i edit Email layouts?
The email templates and email layouts can be edited in the following files:
Templates: app/Views/Emails/html/* and app/Views/Emails/text/* Layout: app/Views/Layouts/Emails/html/* and app/Views/Layouts/Emails/text/* -
How to add other Translations?
In order for EMCMS to support another language here are the steps you need to follow.
NOTE: you must have some basic knowledge of FTP and must have access to the source files.
- First you need through admin pannel to add a new language.
-
Navigate to `SiteSpecification > Languages > New Language`.
After adding the new language take notice of the `locale` of the language created because we will need it later. - Open FTP or login to your cPanel and create a new folder with desired `locale`. The folder should look something like this: `/app/Locale/{locale}/LC_MESSAGES/default.po`
- Copy the content of `app/Locale/default.pot` to `/app/Locale/{locale}/LC_MESSAGES/default.po` and rename the file from `pot` to `po`.
- Open the file with `poEdit` application and start editing strings.
- For more info refer to the Documentation of EMCMS Rental.
-
Where do I change the calendar color?
Calendar related CSS is located in:
app/webroot/css/common/calendar/jquery.dop.BackendBookingCalendarPRO.css
app/webroot/css/common/calendar/jquery.dop.FrontendBookingCalendarPRO.css
-
How to change Favicon?
Got to app/webroot there you can replace the actual favicon with yours
-
Hot To Clear EMCMS Cache?
- Navigate to app/temp/cache there you have 2 subfolders -models and -persistent
Open each folder and delete all the files inside them. NOTE: DO NOT delete the folder itself only the files inside them.
Sources and Credits
I've used the following images, icons, plugins or other files as listed.
- https://adminlte.io/themes/AdminLTE/index2.html from Alexander Pierce
- https://getbootstrap.com/docs/3.3/ from Twitter Bootstrap
- https://fontawesome.com/
- https://datatables.net/
- https://farbelous.io/fontawesome-iconpicker/
- https://jquery.com/
- https://jqueryui.com/
- https://modernizr.com/
- http://joanclaret.github.io/slide-and-swipe-menu/
- http://doersguild.github.io/jQuery.print/
- https://github.com/googlemaps/v3-utility-library/tree/master/infobox
- https://github.com/googlemaps/js-marker-clusterer
- https://github.com/artpolikarpov/fotorama from Artem Polikarpov
- http://www.daterangepicker.com/
- https://github.com/utatti/perfect-scrollbar from Hyunje Jun
- https://www.dropzonejs.com/
- https://github.com/OwlCarousel2/OwlCarousel2
- https://github.com/mstratman/jQuery-Smart-Wizard
- https://github.com/CodeSeven/toastr
- https://github.com/websanova/wChar
- http://cdn.trunknetworks.com/bootstrap-switch/
Thank you for purchasing my script. If you have any questions that are beyond the scope of this help file, please feel free to email via my user page contact form here. I'd be glad to help you if you have any questions relating to this script. No guarantees, but I'll do my best to assist.Thanks so much!